I now have my Tutor's feedback so I'll add his comments in red and mine in green
The final assignment for DPP asks that I apply all that I have learnt to build a course of 10-12 final images based on a theme of my choice. In addition once I have completed my collection I should return to the brief and consider how well I completed my project, how it matched my intentions and to write a reflective account to accompany my images of around 500 words.
This is quite an open assignment with has interesting challenges and also some exciting exploration.
I have exchanged some emails with my tutor earlier in this module and some ideas have started to form. I do enjoy the challenges of of mono photography and have an interest in many elements of photography, which does include combining multiple images into a single High Dynamic Range (HDR) image.
I have been successful in having a few images published in the local paper and this led me along the thought of creating some black and white HDR images from around the area in which I live and the area covered by the paper. This also allows me to combine some of the elements I've learnt from some photographers I've studies as part of this module and includes:
- Sebastio Selgado - The Genesis in particular simulating film from digital images
- Michael Kenna - mono images and the lighting used
- Alfred Stieglitz - The Equivalents in terms of intent
HDR images are not for everyone and I'm not sure that any mainstream photographers have delved significantly into this genre. I'm particular interested and amazed and some of the incredible images that can be produced. Though perhaps the amount of digital manipulation used in creating these images gives rise to certain ethical questioning from a photographic perspective the creation of art is individual approach and intent and should be explored both from a learning viewpoint but also taking on the risk of exploration and seeing where this can take you.
Of course I'm now beginning to learn the advantages of exploration and research both in terms of inspiration, technique, style and approach before I myself commence my assignment.
Whilst I was very interest in creating colour HDR images I've decided that I will first attempt to create a set of mono images so that the simplicity of the image is more apparent and that the images can be broken down into tonal ranges that are not easily depicted in colour.
There are a number of fairly well known HDR photographers whose work I have looked ar
Malcolm Macgregor - he has a website called http://malcolmmacgregorphotography.com/ Malcom is also co-founder of which is an on-line training location on HDR Photography www.schoolofhdr.com
Trey Radcliff - he has a website called http://www.stuckincustoms.com/ He also has tutorials, some ebooks and a DVD series related to his HDR imagery. This following HDR image contains a cityscape but with some digital editing it appears to be within the confines of an office:
Tim Clarke - he has a website that can be found here http://www.timclarkehdr.com/. His work is a little subdued in its extremism compared to some HDR image producers. I particularly like this image of his where the simplicity of the image makes it so interesting and has included elements of curves to add energy to the image:
This following link details about 20 key HDR photographers and offers links to their individual HDR websites
http://speckyboy.com/2012/02/26/20-hdr-photographers-worth-watching/
I have a book called "Practical HDR" by David Nightingale which details a guide to creating HDR images and talks about the various tools available.
This has been a very helpful book for explaining much of the photographic science behind HDR images, techniques for processing, pros and cons for tools including worked examples using them. There are also a great selection of inspirational images, colour and mono.
I'm also a subscriber to flickrt and this particular group specialising in HDR images: https://www.flickr.com/groups/hdr_photos/ The images can be very inspiring and clearly some contributirs are either more skilled or adept at others but the variety of images is excellent. I enjoy seeing what some people have created.
I have and use the Photomatix Pro tool from software company www.hdrsoft.com
All these elements combine toward my growing interest and knowledge in creating HDR images and sometimes I need to refer back as some elements that may not have fully made sense when I read them now allow a greater understanding when I read them again.
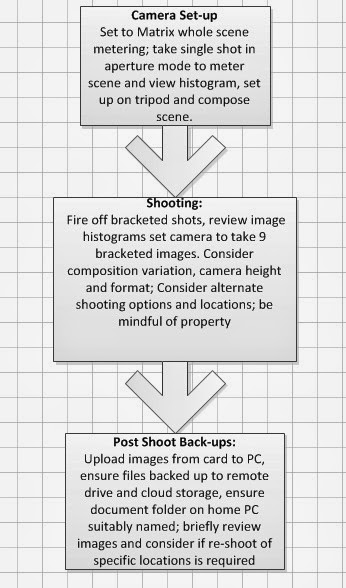
Pre-shoot Work Flow
So I've adapted my workflow for DPP Assignment 5. My pre-shoot workflow will often vary and the act of writing this does help. I do also use "down-time" to review in my head my intentions and desired outcomes and can rework and formulate this across several days. In summary it is as follows for this shoot, or likely multiple shoots across multiple days / weeks.
I know have a ruck sack and messenger style bag and choice of use depends on equipment being carried. For these shoot I've used a wide angle zoom (16-35mm) and a longer zoom (80-200mm). These gives me the ranges I need but at the same time allows me to be flexible and remain fairly light and manoeuvrable on location as some sites I identified are not easily accessible by car
Shoot Work Flow
Adaptable and constant assessment of images in camera and their histograms are required. There is a requirement to remember that some images will be over and under exposed by bracketing. I've chosen to expose correctly one image metered by the camera then bracket either side 4 times at one stop differences creating 9 images in total covering 9 stops in total. This is my high level work flow:
In performing some early reviews of the images I identified that some location shots would need to be repeated. This was because :
1. In using a UWA lens, and not a tilt and shift lens there was some perspective distortion which when corrected would result in image crop and not meet the original intention of the image composition I wanted. This will described in post processing
2. In using the longer zoom lens with hood I appeared to get some light vignetting on the image which I was not happy with. This will described in post processing
Post-Shoot Work Flow
Post Processing Thoughts
So having experimented with HDR images earlier during DPP the process of obtaining a starting exposure for the average scene is understood and obtained using matrix rather than spot metering. From here I will take a further 8 bracketed shots, 4 over and 4 under exposed, each by one full stop.
I will then combine each of the 9 RAW files using photomatix. This will then create a HDR image. However whilst the HDR image contains all the data captured by the combined images, unless using a specialised monitor then this detail cannot be viewed correctly. The HDR 32-bit image should now converted back to a Low Dynamic Range (LDR) 16 bit image. Its important to note the difference between bits and bytes as many people do get confused when boasting internet download speeds. 8 bits make a byte and a bit is represented by a 1 or zero in binary. I will be using Photomatix Pro to also perform my tone mapping and into mono.
With each LDR image I will then use the Silver Effex pro plug in using the initial high contrast preset. I will then use a film type simulator within SEP to select for each image a film type of Ilford Delta 100 pro as this film type is known for its grain, sharpness and tonal range. I believe this was / is an expensive film to process. Salgado in his Genesis set used Film Pack 3 to emulate film stock Tri X and so I feel I am both experimenting and risk taking in my attempts to simulate / emulate black and white film yet capturing the images in digital.
Post processing will then within SEP allow me some further changes where I will generally consider structure slider and contrast slider and brightness slider adjustments.
Back in Photoshop I will save the unflattened file, sharpen and consider any cropping adjustments I feel are required. The image will be saved again, then flattened and saved again.
With my images I will consider my selections to obtain between 10-12 final images. Allow some rest time then review
With my final selection I will resize for my assignment submission, learning blog and for the top images apply a watermark and include in my website.
I will in the next section for a selection of the final images show in detail my post processing workflow that may include some small deviations to the above. However since the general post processing workflow for each image will be the same I will not repeat it for each one.
Image 1
This starts of with my local church in Lydbrook. Whilst not a regular attendee it still has the focal point of any village and I have attended the church for weddings, funerals, and christenings.
Detailed below is my final image and underneath this I will detail my workflow to get to this stage:
The image has been composed in the plan that
pathway at the bottom left leads the viewer to the door of the church across
the church and the cloud structure down and back across to the lighter coloured
grave bottom right.
The following 9 RAW images are loaded into Photomatix as
a set of bracketed of raw files:
With no changes made to the default pre-process options:
The combined HDR image is displayed below. In David
Nightingale’s book “Practical HDR” he explains how the 32 bit HDR image cannot
be viewed in its true detail with a specialist display device and so the image
needs to be converted back to a LDR image using the process tone mapping.
The LDR image (16 bit) preview is detailed below:

As part of the LDR tone mapping process there are some
conversion options and I’m no real expert here but generally I find its worth
experimenting by moving the sliders their full extent so I know exactly what
they can do and then I can make adjustments that are pleasing to my eye. When
processing mono images many of sliders become redundant. I’ll then save this
file and open in Photoshop. Of course at this stage I have already realised the
church perspective distortion caused by using a UWA lens and having a low point
below the bottom of the church which results in my lens face not being parallel
to the walls of the church. However you will note the extra space I have left
at the top of the church. This required another shoot on another day to
recapture this image leaving this space because when correcting the building’s
perspective *leaning back) straightening raises its height and I lost the
weather vane on the top of the image. Another tip I have learnt for the future.
Selecting Filter>Lens Correction I initially type in
the type of camera and where possible lens I am using then move to the custom
tab and in this case I’ve reduced the vertical perspective to -100 to straighten
it.
I’ve saved the file at this point and then moved to
Silver Effex Pro and used the High Structure (Smooth) preset as this really
brings out the tonal range and depth and texture to the image:
Note the original pre-SEP changes is at the top, and my
amendments in the image underneath it
In the same ways as Salgado I’ve decided to emulate a
black and white film type using Ilford Delta 100 Pro and I’ve used this for all
my assignment images. This brings a more intense, grainy and textured feel to
the image that I really like. I have experimented in the past with some film
types but this I really like, especially the drama it can create in the skies.
I’ve then slightly increased the structure to intensify the texture in the
image:
At this stage where I am nearing my original intent I
notice that wording on the gravestone bottom right is visible. From an ethical
point of view this could be upsetting to relatives should the name and details
be visible.
In Photoshop selecting an area on the grave using Polygon
Lasso tool then Filters>Blur>Gaussian Bur and a radius of 8.8 I believe I
have sufficiently blurred the inscription:
Then saving the changes, applying sharpening with unsharp
mask I’ll save again then flatten the image. At this stage I will save the
image as:
- A
maximum sized file (10mb)
- A
reduced sized file for my assignment (approx 2mb)
- A
web sized file for my blog (approx 100k)
-
1. Using
the file from 3 above apply my website watermark and use this image for any
social media websites I display this including my website. As a point of note within
the EXIF file I also have my copyright details included. There is some
discussion around changes in the law with regard to orphan images so I feel it
important to assert myself as being associated with my images. The following
link details this statement from the British Photographic council further: http://www.rps.org/news/2014/august/bpc-copyright-statement
Whilst I have not created a photo realistic image, using
black and white in itself changes this, I have created an image at this point
in my development I am happy with in the final image at the top of section
Image 1. I have wanted to create an image with depth, texture, grain and
contrast and in this particular case wanted to create an image of the church in
an imposing way. This represents strength, some mystery and with the
gravestones included some reality. Of course the inside of a church is much
more peaceful and calming and perhaps having these two contrasts is why the
inside has this peaceful feel. This could be something to explore at another
time.
All my images that follow use this same workflow, perhaps
with some adjustments / tweaks to sliders etc. However using the same workflow
then helps bind these images as a set
.
My tutor advised me that perhaps I should give some more emotional feedback as this was the binding element for me, which as a set of images only may not be held together well
Image 2
A moored boat on the river leading into Lydney
Harbour:
My tutor describes this as one of the less well composed images. I have tried to compose this leaving a little more room at the front rather than the back for it "to move into". My late Father was an 11 year Royal Navy man and had always wanted a small boat. Unfortunately he never got to realise this ambition but seeing these always returns me to his ambition
Image 3
This is an image looking across the Severn Estuary
from the Lydney side when the tide is out. I’ve “letter boxed” this image to
crop some of the uninteresting elements at the bottom of the image but also to
accentuate the width of the image. I find the shapes and the reflections very interesting as the tide is nearly out
In this image I've tried to compose this to give the image a lot of depth with the water joining foreground to background. The Severn estuary is tidal and so empties and refills which always amazes me. I have seen people cross this by foot when the tide is out but I'm not sure I'm so brave
Image 4
This is
one of Cannop Ponds and reminds of all the summer holidays as a young lad spent
fishing. This took a few visits to coincide with someone fishing and the young
lad in the left bottom corner created a perfect memory. In this image the boy
fishing is to be discovered by viewer.
At this size the boy is perhaps a little hard to find. I have spent many visits with my partner and.or children walking around these ponds and there always seems to be something different for the children to discover. Though both now 19 and 16 they still enjoy the walk and see more now they are older the beauty of the scene
Image 5
This is
the Jovial Colliers where I’ve celebrated many New Years Eve parties, various
functions and just normal socialising. It has only recently re-opened after
being damaged following flooding so its pleasing to see the pub back open
This pub has only just returned to active duty after 18 months of repairs caused by floods in my village. At the time chairs and tables were seen floating inside the pub an empty beer barrels floating out side in the main road of the village. To give some perspective to the height of the water in the garage next door water had risen above the bonnets of parked transit vans. Its good to see that pub is back in use and acts as one of several social points for people in the village
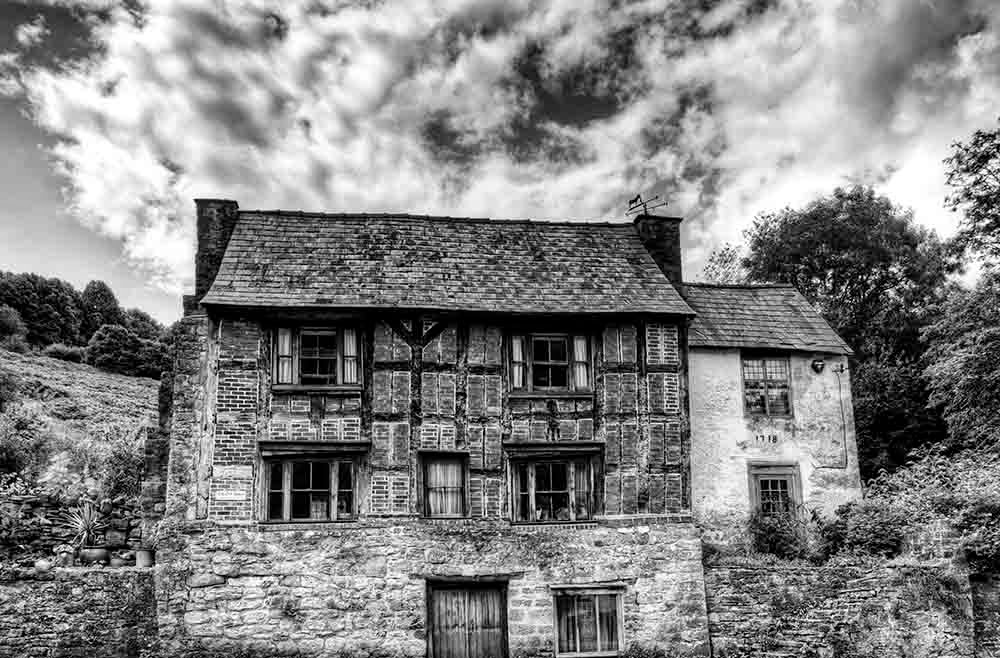
Image 6
This is
the red house opposite the Anchor Pub. The house has such character.
I think perhaps I should have cropped in more for this image, my tutor commented that this was one of the least well composed images, I have zoom cropped this but personally I prefer my original composition:
Image 7
Looking
down the Severn estuary towards the smaller of the two Severn bridges, One that
I used to cross twice a day on my journey to work in Bristol.
One of the things I failed to mention was that each time I crossed the bridge, rain or shine, I always open both windows to feel the breeze and to breathe in the air. This always made me feel free instead of trapped within the confines of my car
Image 8
The Standing
Stones at Lydney. This location by the river is a place I visit a lot; its very
peaceful and has some amazing sunsets and sun rises.
I've always liked the texture of these stones and they remind me of the "healing" stones at Stonehenge. Whilst much smaller in size and with no historical aspect I still find them rather fascinating
Image 9
This
image is taken on Spences Airfield at Eastbach with my back to my house. This
tree is visible from the front of my house but is just out of shot in the final
image below. The light was behind the
tree so that I could capture in silhouette the filigree of the tree’s branches.
Image 10
This
image is of Spence’s Airfield at Eastbach and was taken from the front of my
house with an 80-200 mm lens. Spence’s Field is a very small airfield operating
a few small planes and micro lights. Timing was key in terms of light, cloud
and a plane being readied

The word
“photograph” means to paint with light and this is one of the reasons why
photography is regarded as a creative art. Whilst there is argument that the
photographer is simply capturing what is presented in front of him/her one of
the arts of photography is to create an image. The photographer could attempt
to define the pre-visualisation, understand the elements required to create
this image. However that said there is much to exploration and identifying a
theme and seeing where that takes you. My visit to the Gloucester Art College
looking at their work very much exemplified this for me.
Stieglitz
talked about taking photographs of clouds to identify what he had learnt. I
like to interpret this to mean he challenged himself to produce images that met
what he had pre-visualised and therefore with this creation he could share the
emotions that he tried to capture in digital form, “to hold a moment, how to
record something so completely, that all who see [the picture of it will relive
an equivalent of what has been expressed." Salgado has used digital techniques to simulate
black and white film and its unique image qualities within is digital work
Genesis. Michael Kenna though often using long exposure was able to capture simple
elements painted successfully with light. HDR images when created using a fixed
aperture as I have done are using variations of exposure time, both long and
short to create a set of static images that are to be later combined.
One of the
great challenges with digital photography has always been the limitations of
the dynamic range of the camera sensor when compared to the eye. It is often impossible
to capture in one shot. This is where HDR images can replicate this to some
degree and in this set creating images in black and white with specific digital
processing including simulation of black and white film will perhaps, as
Benjamin Beker quotes, “blur the boundaries between fact and fiction”.
Photography does have this ability.
For this set
of images I’ve decided to focus on elements within my local area that have an
impact and an emotion for me for a variety of reasons. Perhaps at times I’ve been
able to capture elements of my emotion within these images; its difficult for
me to judge how successful I’ve been as I feel its probably one of the first
times I’ve tried to do this. I am beginning to see another element to
photography besides the initial image and perhaps may have taken one small step
toward what Stieglitz achieved. I kept to a minimum of 10 images as I believed
this were not only my strongest but were the nearest to my intent. There are
many images that didn’t make the cut, mostly variations of those that did but
also many where I failed to create my pre-visualised image and for it to
reflect the emotion I tried to create. I did not want to include 2 further images
as they would have detracted from the set I have produced.
I feel I have
put a lot into this assignment and I’m sure there is no surprise that I feel it’s
the best set of images for an assignment so far. The open brief was both
challenging and exciting. It will be good to hear the feedback of my tutor and
colleagues to see how they interpret these images.
I expect
there is more that I could have done as part of the HDR and LDR processing and
also within Silver Efex Pro. I think as my knowledge and skills grow with these
tools I will be far more demanding of what I produce.
Images 2 and
3 are perhaps my weakest and I didn’t quite achieve what I intended, I was
challenged around images 1, 5 and 6 where I have learnt to use with much more
confidence how to make perspective changes due to issues caused using an ultra wide
angle lens (16-45mm on a full frame camera). Additionally I learnt to leave
more space at the top of the frame understanding that later processing could
result in the top of the images being put to close to the top of the frame.
Images 4, 7,
9 and 10 I feel are more strongest as they get the closer to what I had
visualised and what I wanted to capture and express through the post processing
activities. All images are processed using the same workflow explained as part
of image 1.
The
influences of some of the photographer’s suggested I research have had a
significant impact on my approach and understanding. Some which is from reading
about them and some by just looking at their images with a developing critical
eye.
I’ve detailed
below a small of some of the images not making the final cut:


Overall Comments
Your final assignment on monochromatic high dynamic range photography is technically quite good, the results are interesting, where it is nice to see a change from the usually over saturated vivid colour renditions of HDR that swamp the
internet. Although you have mentioned that the work has emotion/impact for yourself, I feel that they are only connected through the technique. Your technical research is good that guides and informs your work well, coupled with
some very good observational comments, which together reinforce your learning log nicely.
Oh dear. Well I'm pleased my images demonstrate a fairly decent technical skill level but I'm disappointed that I've failed on the connection between the images. I've actually taken risk here in trying to demonstrate an emotive element to a set of images. Photography like art can be a demonstration if inner feeling that might not always be appreciated by the viewer. I suspect my failings here could be:
a) not expressing this sufficiently in my assignment
b) I've gambled on a selection of elements around my local area that have meaning to me. Perhaps I should have tried to be consistent in the type of image e.g. buildings, landscape, simple minimalistic landscape. I think a set of 10-12 images was perhaps too much for the type I allocated to perform the assignment and that I've looked at technical opportunities and have forgotten some of the basic composition elements when creating some images. This will be interesting as I move into P & P and perhaps I need to put more time into my pre-shoot workflow , particular planning out ideas in advance.
I'm pleased that elsewhere my research and observational comment is being recognised as I am now using research much more (see my formal TAOP assessment feedback). I am trying blog more about my personal view and feeling in response to elements I'm now observing.
Feedback:Demonstration of Technical and Visual Skills:
You have made a very good technical exploration into the process of monochromatic HDR imagery, similar to colour HDR, some of the images do exhibit the artefacts associated with this process. Technically though this area has been researched well with some ideal examples of HDR photographers. The perspective control adjustment of the church was good to see, along with the evidence of how you achieved this.
With your images I wonder if it is the technique that governs their appreciation? I ask this, as compositionally some of the shots are quite basic with no strong framing or
design element. The boat and the pubs are particularly weak in terms of framing, yet image #09 of the tree and #04 of the pond is quite strong.
As mentioned above, perhaps I have allowed technique to have the stronger focus. Balance is a key element in photography and I think in this module maybe I've let technique dominate my images instead and basics have let slip. In addition perhaps as a result of the work involved with each image I've been reluctant to throw some away, or even crop within what I've captured. Framing images #4 and #09 actually felt the most easiest and natural compositions when behind the camera. Have I over thought some of the others? I also think I have a tendency to capture things whole, like buildings. I should explore and experiment here. I wonder how this might work with portraits where elements of the human form are instead captured; would this still be called portraiture?
The pre-visualisation and actual workflow guides are good to see as they link back to your on-going development and growth from the courses preceding exercises. Noting about the possible ethical considerations associated with HDR processing being manipulation is very good to read, these lines of thought and questions are ideal for your academic development.
This module has been excellent in me thinking about the ethics associated with image manipulation and doing a limited amount of investigation has revealed how much it happens even to the extent that those involved have spoken out to express that in some cases the camera does lie.
Quality of Outcome
Your word document may not have been needed, as your work was as easily accessible on your blog, although the images were larger and more suited to be viewed via the word file. You have communicated your ideas very suitably for this final assignment, which draws upon your previous investigations and developmental pathway quite ideally. It may be a good idea for the final assessment to edit this project and experiment
with other presentation formats. For example you mention about the emotional aspect of the scenes; sometimes it is difficult to convey this to an audience with just an image, try to compliment them with text. This could take the form of a single
sentence or even a word that is constructed into a book format.
Have a look at Rob Briscoe, a recent OCA graduate and his series ‘Speak My Language’ who investigated some interesting methods of image representation, in particular a long panoramic newspaper style document of his images and text:
http://robtm.co.uk/galleries/sml.html
Ah I think some clarification is perhaps required around the expectation and scope for experimentation for the presentation of assignments. The has been numerous discussions on the Flickr OCA "Over a Cup of Coffee" but the expression has been not to use alternate formats, and the use of blurb books to be very carefully considered. Clive W has also expressed careful consideration with use of Blurb. I have looked at Rob's work, exchanged posts, and seen how at times he has questioned his approach to challenges. My tutor is right and Rob's presentation on his website does indeed look good and effective. Its also beyond my html skill set. I've actually just now made a post on the OCA
"Over a Cup of Coffee"
website.
i did reply to my tutor who suggested perhaps instead some homemade experiments and maybe consider this for level 2. lets see what fellow students also suggest.
Demonstration of Creativity
There is a good level of evidence of your development and personal creativity with this series that is supported through visual research. Although the experimental aspect is a little weak with not much evidence in terms of risk taking and exploring outside of the box. Thematically you are on the right track, it is just making that step from producing visually attractive work to underpinning it with a strong visual discourse that is informed through sustained theoretical research.
This has been a weak area for me for TAOP and to be honest I didn't fully appreciate this style of learning (its been a long time since I was studying) and I'm starting to embrace this as part of learning and also approach to exercises and assignments. I believe this is influencing my understanding of photography, seeing how diverse it can be but also learning from the techniques and skills of established image makers. This was an area I asked my tutor to help me with at the start of DPP and he has; I hope this is also being reflected in my photography to a degree in addition to my blogging.
Learning Log & Contextualisation
Your critical reflection was good to read, you have made some poignant comments regarding the nature of research. Indeed, all visual artists should be continually informing their practice through sustained research, albeit technical or theoretical, development needs to occur. Your trip to see the Art & Design
students work in Gloucester is a great example of this, as this exposes you to other mediums that all collate in providing visual stimuli. It is interesting to see how photography can be used as the final piece, a tool to document, for example
the fashion piece, or be used as an artefact like the crime scene.
I appreciate my tutor making special note of this and it encourages to do this more. Its definitely visually stimulating and demonstrates to me a range of diversity and risk taking. I've found that when looking at art, be it photographic or otherwise I look past what may have been my initial view and look a bit deeper, both with critical eye but also appreciation of of intent, risk and expression. Its quite an interesting change into how I view things now.
Suggested reading/viewing & Pointers for the next assignment
To conclude this has been a technically good and suitable final assignment that compliments your technical prowess and investigations. It has been viewed quite positively; your development is noted and it has been good to read your
comments on the tutor reports, which evidences your interpretation and attentiveness to the developmental nature of academia, well done.
I can see by your blog you have already been assigned and commenced your next unit on ‘People & Place’. This is a great unit that will hopefully push your critical investigations further and get you to explore visual language and photography in a wider context. Please see below a few links that may be of use,
the first is a book I may have mentioned on portrait lighting; the other two are some interesting photographers, in particular Andy Freeberg who may be of use for one of the portrait assignments that deals with space:
http://www.amazon.co.uk/Lighting-Portrait-Photography-Revised-Edition/dp/2940378304
http://andyfreeberg.com/guardians.html
http://www.steveschofield.com/#!land-of-the-free/cxbe
Thanks and there is a lesson here for me not become so engrossed in the technical elements that it reduces creative and compositional skills, it should be complementary.
In summary my exposure to research and investigations I think are improving my thinking. I have also participated more within the OCA forums and Clive W has given me some good advice, which I logged in my post about Stieglitz's Equivalents and the thinking behind visualisation, expression and intent. I believe my photography has started to move to a new level but at the same time the more I learn the more I see there is to learn. Its an interesting dilemma and I'm enjoying the challenge and I approach the next in the knowledge it will not be easy, and I doubt I'd enjoy it if it wasn't.
My website is improved and I'm receiving good comments. On the back of this I have been asked to perform a family portrait session and also have a Wedding booked for me to perform the photography toward the end of October - exciting challenges!