Tuesday 29 April 2014

Michael Kenna - Long exposure night images in mono

Michael Kenna - Long exposure night images in mono

My tutor suggested a couple of Photographer's work to have a look at, considering Assignment 3 is a requirement for producing mono images. As I'm now just about to look at mono photography leading up to assignment 3 in terms of projects and exercises now seems an ideal time.

Looking initially Kenna's work I am stunned by the simplicity of some of his images yet have a complexity in terms tonal range, contrast and their ability to almost fixate my eyes within the boundaries of the image and let me wander all over of the image.

His images emphasise to me much of what Freeman talks about in his book The Photographer's Eye regarding shape and lines etc. below I detail some images from his website http://www.michaelkenna.net/.

Triangles in his image "Eighteen Hedges"


Diagonals in his image "French Canal"


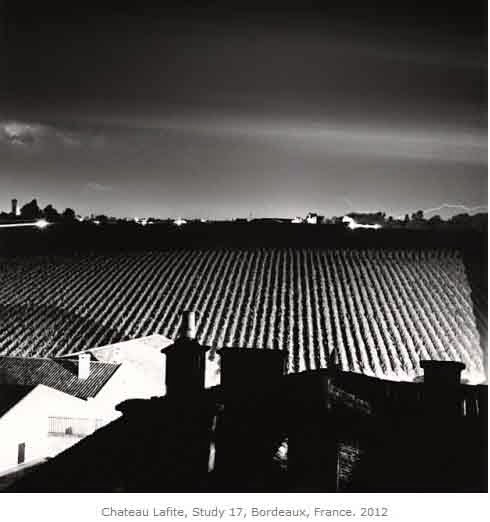
Horizontal and Vertical Lines in his image Chateau Lafite


It is at this point I must thank Michael Freeman for his book The Photographer's Eye and photography module, The Art Of Photography for helping identify and recognise the importance of such elements when creating an image and being able to recognise their simplicity yet power within an image.

Myself being a late starter into the art of photography aged 44 and therefore straight into digital world my initial instinct would be that these are images created on a digital camera on tripod with long exposures (cloud and water movement) but using a dark Neutral Density filter such as a 10 stop ND filter to prevent over exposure. This would likely be the equipment I would use should I wish to create images in a similar mould.

However Kenna uses medium format cameras and says he can get through 10-15 rolls of film a day which no doubt have a cost implication not only in purchase but in processing.

 I read from a wiki page about him that "Kenna's photography focuses on unusual landscapes with ethereal light achieved by photographing at dawn or at night with exposures of up to 10 hours. Since about 1986 he has mainly used Hasselblad medium format and Holga cameras and this accounts for the square format of most of his photographs"

http://en.wikipedia.org/wiki/Michael_Kenna_(photographer)

An interview of Michael Kenna by Dean Brierly details some interesting facts:

 - Kenna attended a 3 year photography course at the London School of Printing
 - He worked as a black and white printer for an advertising photographer Anthony Blake
 - He printed in San Francisco for Ruth Bernhard who progressed him "in both logical thinking and wild imagination".

The majority of his images are long exposures and are therefore taken at night or predawn so that it takes longer to expose the film. Subject to the scene he is capturing these images would then capture the movement of elements that can move such as water, transport, clouds.

Some types of photography record what is visible by the human eye, but simply not visible to all because you have to be in the right place at the right time, such as reportage photography. Other photography can be as simple as capturing images with the camera held at a different level to that the eyes see at. Macro photography can examine detail at a level the eye would not normal see and some close-up photography can create wonderful abstract imagery from the simple and every day objects we see around us.

Kenna says "Perhaps most intriguing of all is that it is possible to photograph what is impossible for the human eye to see - cumulative time". I find this quite a fascinating concept and possible creates another genre of photography to some of these I've mentioned above.

Whilst Kenna does indeed use a ND filter, he may also combine this with slow speed film. Slow speed film in the digital world would equate to low numbered ISO.  In addition during this interview he also confirms he uses a red filter, which i recall from TAOP that this will darken the other prime colours Blue and Green. In the digital world whilst a red filter could easily be placed on the lens, using a post processing tool such as Silver Efex Pro applying different colour filters can be experimented with to create the image you may have pre-visualised.

On the subject of pre-visualisation, it is something often encouraged in photography, many arts and even sports since who can you get somewhere when you don't know were you want to get to. Kenna quotes Ray Metzker who equates pre-visualisation with constipation! When asked by Brierly what attracted him to night time photography he replies "its unpredictability".

I find this quite a refreshing statement when at times photography can be so much about precision and conformance to rules and expectation, that it can also be so much about unpredictability and exploration. In fact many discoveries in many fields, not just photography, have come from these values.

Whilst Kenna's image Night Ferry, below confirms to many of the values Freeman highlights in his book such as lead in lines, the energy and dynamics of diagonal lines and the creation of captured movement but allowing space for the static yet understood moving object to move into, yet further movement is implied.


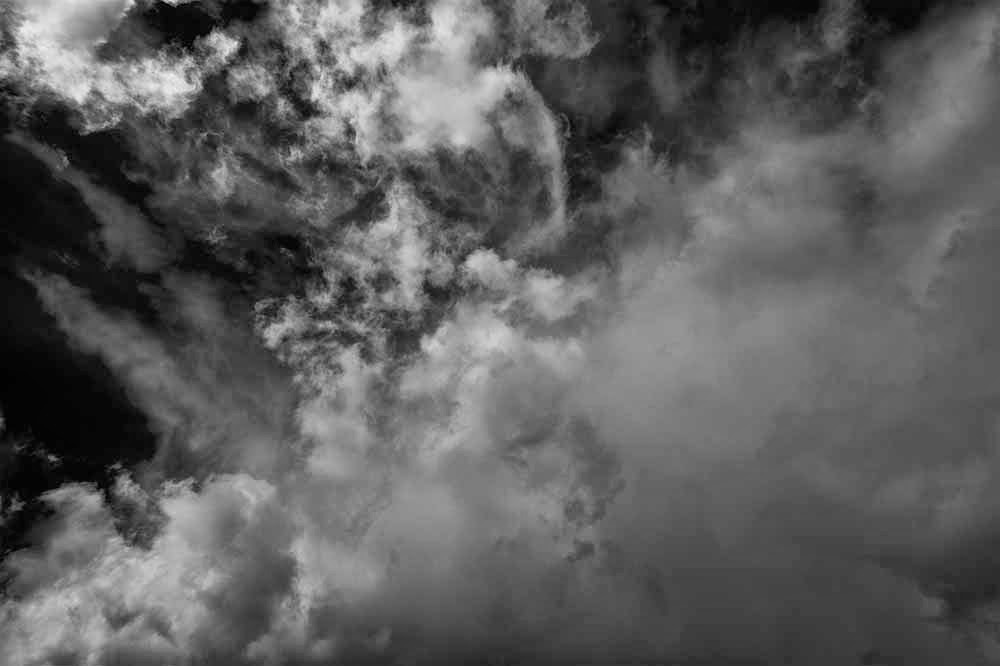
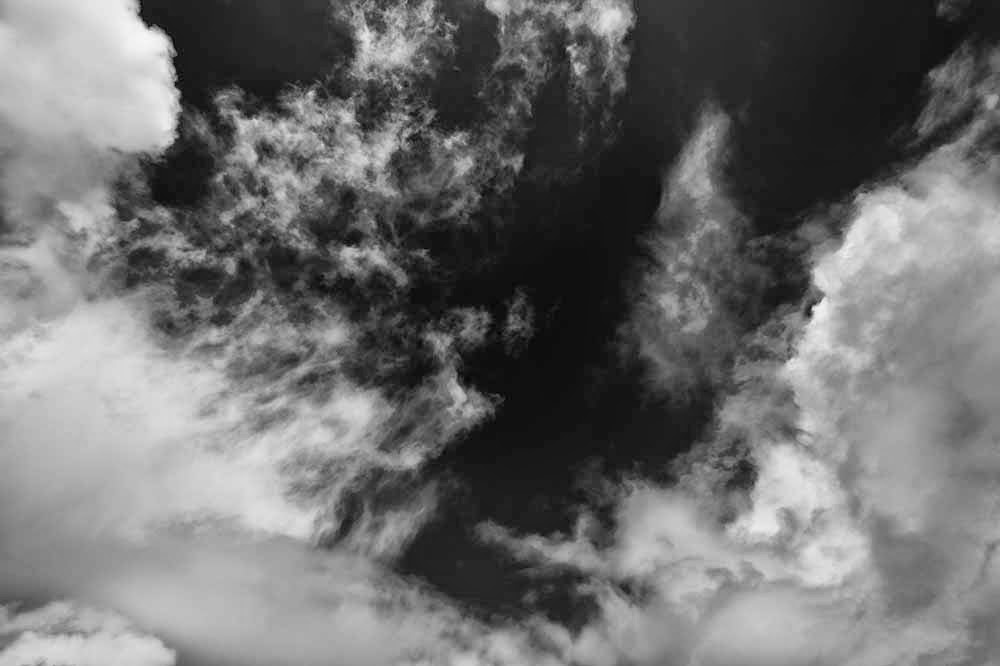
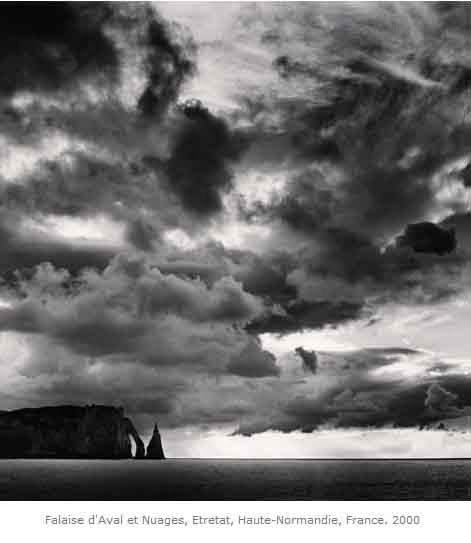
Yet in his image Falaise d'Aval et Nuages, Kenna is clearly breaking the rule of thirds with the sky dominating almost 90% of the image but is so much the better for it with the drama and structure  of the sky and clouds.


However the interesting cliff and archway gives  much needed perspective and the serene sea gives contrast to the active sky.

With Kenna's statements around pre-visualisation he must be referring to elements regarding exposure and how colours, tones and shapes will be exposed under long exposure when recorded in black and white since many of the scenes and camera placement are certainly premeditated.

This has inspired to consider several elements going forward with black and white photography and how I would also like to experiment with:

 - long daytime exposures using say a 10 stop ND filter
 - long nighttime exposures
 - capturing of dramatic skies and making these dominant within images

 - use of a red filter, likely in post processing to darken the colours blue and green which in      landscape colour photography are likely the 2 dominant colours in sky and grass/foliage


Even Kenna's dramatic images have a serenity about them yet have so much for the eye to explore both in terms of shapes, tones, and contrast. 

I've very much enjoyed discovering some Kenna's work in terms of his images and I think there is much more to learn about film processing and printing. Should black and white film processing and printing become a route I wish to explore in the future I think understanding Kenna's techniques and processes would be a good place to start. 


Sunday 27 April 2014

DPP Part 3 - Creative Interpretation - Exercise 1:Interpretive Processing

DPP Part 3 - Creative Interpretation - Exercise 1 Interpretive Processing

This exercise is about making interpretations for a creative purpose.

I've selected this image, below, as a RAW file prior to RAW processing and will make 3 different versions of the image.


Each will be detailed with:

a) an explanation of what I'm trying to achieve
b) how successful I thought I was


Version 1

My intention, particularly as this was taken in the final golden hour, is to create a warm image emphasising the colours of the sunset.

I've reduced the whites to help reduce the obvious highlight clipping caused by photographing directly into the sun. I've increased the colour temperature to 8000. I've increased the saturation to 20 which also emphasises the rim rim lighting of the subject's hair back lit from the setting sun


I believe this has been successful, possibly the image looks a bit too orange but the rim lighting of the subjects head does make the subject clear as the key subject in the image.


Version 2

My intention for this next image is to focus on creating a warm blue sky with the subject the horizon which I want to put into silhouette. However whilst I want the viewer to initially focus on the sky and the horizon I want the viewer to still explore the image to find the girl in the foreground, hidden amongst the shadows.


I'm happy with blue sky and the horizon but I feel the girl is too lost on the image


Version 3

In this image I 'll try to create a balance of the two versions above e.g. retain the baby blues in the sky and the warmth of the sun and bring out the subject more, as opposed to version 2 where she appears hidden and retain the rim lighting of the hair.

To achieve this I've reduced the colour temperature increased highlights, shadows, vibrancy and decreased exposure slightly.


I'm quite pleased with version 3 but I think I may have too much shadow in the foreground. However I have retained warmth from the setting sun, wonderful blues in the sky, rim lighting of the subject's hair and the subject more visible in the image. However this is somewhat removed from the original image

For anyone who views my blog please do confirm which image you prefer.


Exercise Learning's

a) The amount of post processing can be a dilemma the degree of what post processing should be performed. It can be one of photographers pre-visualisation, amending an image to display what the photographer originally saw, or simply to recover the image if the initial was was not say correctly exposed. However there can be a social dilemma in that the processed image was not reflective of the actual moment in time. Reportage photography does carry an element of responsibility

b) There needs to be a visualisation during post processing of what the final image will be used for and what the visualisation of that final image is to be

c) Experimentation is required with the elements of the raw processing tool and the post processing tool to fully understand what each can


DPP Part 3 - Processing the Image - Exercise 3: Managing Colour

DPP Part 3 - Processing the Image - Exercise 3: Managing Colour

For this exercise I am required to find 2 or images that have what I judge to have a significant colour cast on them as the purpose of this exercise is to correct it.

I will be using Adobe Photoshop version CS6


Image 1

I will refer back to an image created as part of Assignment 2, where I have used interior lights in the kitchen to get over a challenge with shadow though in itself it has created a problem  - this image has a magenta colour cast: This is a jpeg, there is no RAW file


On levels I've used the white dropper and placed this on the white tiles which I know will also whiten the kitchen ceiling which displays the magenta colour cast more. I can see for each of the colour channels there has been an adjustment where highlights side of the histogram has been stretched.


However the door on the left appears a little off-white, applying the white the white dropper on the door makes it appear as if its over exposed so I've made a small exposure adjustment, see below:


The final image does look a bit over exposed but I have removed the magenta colour cast I previously had,


Image 2

This image I took fairly recently and was a difficult image to take with the wedding party back lit my natural light, I was shooting into the window and with fluorescent light in the room.

This is the RAW file unprocessed:


Highlight clipping is shown as red. The image has a colour cast from the man made light.


I've adjust the white balance temperature to 4400 which is within the colour temperature range cool white fluorescent and day white fluorescent. I've reduced the whites slightly to reduce highlight clipping, adjusting exposure would result in the faces being too shadowed. I've also adjusted shadows just to the point before shadow clipping starts.


I've cropped the image to eliminate windows either side of the group and the radiators also both sides. I've considered hue / saturation but I'm happy with colour rendition now in this image. I'm a lot happier with this final image which looks much more natural


Exercise Learning's
a) I've never used the colour dropper on levels or curves and I personally think its too extreme in its changes and I don't feel in control the way I am when processing a RAW image via the RAW processor

b) For me processing the two images above I have far more control in processing the final image and in the case of image 2 I've not needed to process the image at all once I completed my changes in the RAW processor

c) I've had more control over tone and colour processing the RAW file and I am much happier with processing RAW files

Alfred Stieglitz and "The Equivalents"

Alfred Stieglitz and "The Equivalents" 

As I prepare to complete DPP Assignment 3 which requires identification of scenes suitable for images to be converted to black and white I thought I would perform some research on photographers noted for their black and white images and perhaps creating images that were unique or ground breaking / trend setting in some way.

Alfred Steiglitz is said to be the first person to deliberately create and produce abstract photographs. These abstract photographs that he produced were of clouds, and rather oddly he called these the “Equivalents”  but I'll explain why later. I note that his second wife was Georgia O’Keefe who I recall to liken images of flowers petals such as roses to female genitalia.  Interesting in their extremes but also pioneering in their approaches.

Stieglitz produced a set of around 220 images which he named Equivalents and the majority of these featured only sky with no horizon. One series of “Equivalents” that he produced though apparently did feature polar trees in the foreground.

His choice in photographing clouds, Stieglitz is quoted as saying he meant to demonstrate how "to hold a moment, how to record something so completely, that all who see [the picture of it] will relive an equivalent of what has been expressed."

His initial issues with producing images of the clouds were that due to the photographic emulsions available prior to the 1920’s the emulsions were orthochromatic and sensitive to the blue colour of the spectrum and that the sky would be produced very light on his photographs and the details of the clouds lost against them.

An interesting quote from Stieglitz was “I wanted to photograph clouds to find out what I had learned in forty years about photography”. I feel that some of his choice of subject is down to the fact that their commonness in our everyday lives can mean that we don’t give them a second thought and can ignore their beauty and most certainly their individuality.

A new panchromatic photograph emulsion was developed and this allowed him to produce images that captured the full range of colours and therefore be able to capture clouds within his photographs that could be seen more clearly.

I have enjoyed in the past producing scenes of landscape shot with the camera in portrait mode with an Ultra Wide Angle lens. When converted to mono, and processed with Nik’s silver efex pro cloud structure can be made more prominent and can help create images with dramatic skies. I have also noticed that when I’ve taken images that have contained the clouds and sky as the dominant feature using a converted infrared camera how this can cut through haze and again demonstrate the clouds in a dramatic fashion.

In doing some research on Stieglitz are notice his work had much influence on many people in and outside photography. Notable Ansel Adams is quoted as saying his first “intense experience” in photography was seeing many of the “Equivalents”.
The following link shows a set of Stieglitz’s “Equivalents”:

I notice that the majority of Stieglitz’s images within the “equivalents” sets are quite dark images.

I’ve attempted to create my own set of “equivalents” to help understand the challenges of capturing these images and then to process the black and white conversion with the Silver Efex Pro. Following on in Stieglitz's footsteps I will attempt to create and hold an expression in a small set of images of clouds where the viewer can relive an equivalent feeling of what I captured and wanted to create.

I believe there is just one compound on the planet Earth that exists in 3 forms:


  • Solid
  • Liquid
  • Gas
That is of course water

Like Stieglitz I've used water in its gas form and my equivalent feeling that I would like to express is the wonder of how water in gas form can take on many shapes and patterns. Water in all its forms are created as a result of the heat, or lack of heat, from the item in my fourth image:


All images were processed in Silcver Efex Pro 2 (SEP2) and as Stieglitz are low key images, in some instances I've used SEP2 structure button to emphasise the cloud textures more. Prio to this each image was processed by the Photoshop RAW convertor and exposure amended in response to the highlight clipping that was confirmed plus some curves adjustments

I think Stieglitz would have enjoyed the digital world and using tools such as SEP2

I've exchanged some posts in the student portal with Clive W whom I hop he doesn't mind me saying is a font of wisdom, knowledge and experience from what I've read across a number of forums. I feel it would be good to share some of his thoughts around "equivalents" and "voice" as I think his words will resonate with other students as they have with me.

"A point about Equivalence; It's about when a photograph stops being a picture of things and becomes a metaphor for something else. It's an important conceptual transition for students to make as they progress, from making pictures of things to making images that represent  ideas and/or emotions."

"I have in the past used Stieglitz and his ideas about Equivalents to hopefully dramatise to students the very important concept of the image as metaphor. Understanding and deploying this idea in image making can be what makes the difference between an average mark and an outstanding one."

I questioned my current ability and a desire of progressive to this state of thinking and again Clive kindly responded.

"One thing to try is to not think about it too much.
The general culture that surrounds photography is that some subjects are worthy of being photographed and others are not, often the decision is based on a common beauty or novelty or the challenge of producing work that's an equivalent of work that has proven mass appeal.
If one is already applying that filter then the chances of producing work that has a personal resonance, that property we call 'voice' for convenience, is considerably reduced.
It sounds like rather a Zen cliché but practice not thinking when you're shooting and then the results should naturally be imbued with authentic emotion because you're recognising without rationalising, that can come in post production."

In reading these words a few times this means for me to develop one's own trust, creativeness and observations when deciding how and what to observe and create within the frame. If its something that has meaning to you the photographer, the capture of or an expression of an emotion or feeling. In this way the image created is then the captured emotion which Stieglitz then speaks about sharing this so that the equivalent feeling is felt by the viewer of the image. I know recognise what is meant by the words "developing a personal voice".

Clive has kindly offered some further advice in my forum exchanges with him:

"It's a way of progressing further than the formal appeal, 'lovely light', 'nice colours', 'great composition' to something that can stir a complexity of emotions and responses, depending on the readers experience.

Advertising imagery generally seeks to reduce complexity of meaning in order that everyone reads the same thing very quickly and easily, that's analogous to the one off genre photograph. In order for images to engage for an extended period and deliver more richly they need to challenge the viewer to understand, to create a narrative which explains the image to them. That may encompass the photographer's narrative wholly, or partially, or not at all. That's a very positive property, once an image is released into the wild it's beyond the command of its creator, it will create the reactions it will and one shouldn't expect it to resonate with the whole audience, it will find its niche.

Like seeing faces, animals and structures in clouds; some people see one thing, some another, sometimes the same thing and sometimes nothing."

Clive's final sentence around cloud structure is quite apt given my blog about Stieglitz's clouds

Peter Haveland also added some further reading which is very helpful:

"To get to grips with some of the theory and application of that theory, behind all this you should read (I am assuming that you haven't already done so and anyway other readers might find the info useful!) Roland Barthes' essay, The Rhetoric of the Image which appears in the collection of his essays Image, Music, Text; and it's not the most difficult read! The first essay in that book (The Photographic Message) is worth the read as well and after those you might do worse than to try Myth Today in another collection of his essays, Mythologies ( a Google search might well take you to pdfs of those essays)"

Thank you both very much, I believe I have taken one small step toward enlightenment within the art of photography

Saturday 26 April 2014

HDR - Blended Images - Resolving Exposure Problems

HDR - Blended Images - Resolving Exposure Problems

One of my initial images from Assignment 2 was producing an image of the kitchen. In my blog you'll notice how I struggled with eliminating the shadow from the light on the left of image.

As an experiment I've gone back to this same situation and using my histogram and exposure compensation I will demonstrate, to myself at least, the HDR option to this problem.

Using a tripod and going back to my kitchen I've taken an initial image using the camera's matrix metering for an average exposure.

From this initial image there is over exposure at the light source coming through the window and under exposure, as I suffered from before, on the left side of the floor caused by the kitchen units causing shadow. 

The histogram is showing the dynamic range of the scene is greater than the camera sensor can cope with, it displays both shadow and highlight clipping.


My plan is to first eliminate the shadow clipping which I can see on the histogram if I get some space between so I have started by over exposing 1 full stop.the blacks at point zero, I will of course have highlight clipping also shown on the right of the histogram. There is still shadow clipping so I shall overexpose 1 stop further


I've over exposed now 2 full stops and I can see from the histogram on the camera LCD that I'm no longer shadow clipping with a small space between the blacks and the start of shadows being recorded. I shall now repeat in the same way to under expose a full stop at a time to eliminate highlight clipping


At 1 stop under exposed the camera LCD histogram is showing me I still have highlight clipping so I shall under expose another stop


I'm now at 2 stops under exposed and the histogram shows me I am still clipping highlights so I shall take another image but a further stop under exposed. Its the light from the window that is causing the over exposure.


When viewing the Camera LCD it appeared that I was no longer highlight clipping. Whilst minimal highlights are being clipped there still some clipping. However at this point I no longer under exposed any further


I now have a series of 6 images covering a dynamic range of 6 stops. Blending this 6 images should now create me a HDR image with a wider dynamic range that what the sensor of my camera was able to record.

Whilst the dynamic range of the image is good I have some colour casts from using Photoshop to create a HDR from the RAW unprocessed files.


Using Photomatix I have merged the jpegs and tone-mapped them making no manual adjustments.
Using photomatix I no longer have the colour cast on to top left of the image (ceiling).

I'm not quite sure why there is a big difference, perhaps the HDR capability of photomatix is better than Photoshop. Photomatix is probably the most used / best liked tool so perhaps this is why the final result is better

Anyway this was an interesting experiment to create an image that contains the full dynamic range of the scene. The view that my eyes recorded was very similar to the photomatix HDR image. This again proves that the human eye can record a higher dynamic range than a camera's sensor

Of course viewing the scene with my eyes scanning the scene and focusing on elements within it could be likened to create HDR video in my head.

I often search Luminous Landscapes for information and there is an interesting article called Understanding Histograms which can be found here:

http://www.luminous-landscape.com/tutorials/understanding-series/understanding-histograms.shtml


Ansel Adams and his Zone System within Digital Photography

Ansel Adams and his Zone System within Digital Photography

Background
Prior to DPP Assignment 2 I briefly touched upon Ansel Adams and his zone system.
In my research I find that though Ansel Adams is the man associated with the Zone system that he actually developed this with Fred Archer. With this system he gave black and white film photographers a tool to allow them to control their images.

The zone system was originally created to allow a controlled and standardized way of working to obtain and guarantee a correct exposure. Though created for black and white film photographers, and though created in 1940, it still has a place in the digital world and for images targeted as both black and white, and also colour.

The latest digital cameras have very good matrix metering that perhaps are able to correctly determine exposure in around 90-95% of cases. I mentioned and demonstrated in Assignment 2 how metering could be used creatively, particularly when using spot metering.

Its unusual and exceptional circumstances that can mislead the camera's metering system and incorrectly expose the image or expose the image differently from what the photographer intended.

The benefits of using the zone system are to enable correct exposures of scenes, enable an ability to determine a scene's tones and dynamic range, know how to determine how far apart to take bracketed shots for blending images into images of high dynamic range (HDR). HDR imaging is something I want to develop more skills and explore further. I have proposed some suggestions here to my tutor for Assignment 5 of DPP.

Camera metering will try to evaluate a scene and render it as an average reflectance, 18% grey. Its why we have grey cards, grey cleaning cloths and in the case of Michael freeman's books often an inside cover at 18% grey so that white balance setting can be obtained. However the correct way to set this using a grey card is for the this card to be placed near the subject of the intended image and spot metering for this to determine the WB setting (if not using Auto WB) and correct exposure. My knowledge of Infrared when attempting the same has determined that taking a reading of sunlit grass will achieve this.

So when the camera meters a scene of extreme brightness it will darken it and cause under exposure, and for a scene of too much darkness it will lighten it and cause over exposure

Zonal System
The zone system divides a scene into 10 zones with each zone of tones differing by 1 stop this each zone of tones across the scene differs by one stop.

Zone 5 (but not the middle of 10) is used to determine the middle tone, the tine with the average reflectance of 18%.

Now in relation to Ansel's use in black and white film, and meeting the challenge of my tutor in his feedback of DPP Assignment 2 for digital photography the darkest element of the scene recorded in this histogram is determined as Zone 3, point 0 on the histogram. For the brightest element its determined as Zone 7 and given point 255 on the histogram. This neatly puts Zone 5 in the middle between zones 3 and 7.

This is because in landscape images highlights and shadows are important. Light tones will lose detail after zone 7, and dark tones such shadows will lose detail before zone 3

How to measure using the Zonal system with a digital camera
Pointing my camera at an area of average reflectance should obtain an exposure reading of zero on the camera's meter.

Using the scale in one of my earlier posts I know that increasing the aperture by one stop or decreasing the shutter speed by one stop will over exposure the element I just metered by 1 stop making it lighter than it is. Doing the opposite with the aperture or shutter speed will allow me to darken this element by one stop making it appear in my image darker than it actually is.

Using the camera's spot meter in a scene and identifying the most important high light that should have maximum detail and vice-versa for the most important darks. So where elements fall out side the range of -2 stops and plus 2 stops form where you have decided to take an average meter reading to set to 18% then these areas outside will not be unlikely to have much detail captured. However detail can more easily be recovered from darks than it can whites so exposure should be judge so that the brightest pixels should be placed near to but not on the extreme right of the histogram.

When to use HDR and how to judge how far to over and under expose. 
So using matrix metering your digital camera will expose based on what it determines the average reflectance of the scene to set at zone 5, or zero on the camera metering. By adjusting the exposure to over expose 1 stop at a time pressing the shutter at each and continue until the histogram shows a slight gap between the darks recorded and the left hand side of the histogram. Repeat this from the exposure settings identified originally and under expose until the histogram shows a slight gap between the lights and the right hand side of the histogram pressing the shutter each time. Combining this set of images will create a HDR image that has captured the complete dynamic range of the scene. Interestingly this is likely to create an image similar to what your eyes was able to determine.

I've exampled this below in a series of images using the troublesome kitchen and lighting conditions that caused me problems in Assignment 2


Your eyes moving around and across this scene, capable of much more dynamic range than the camera's sensor is in affect creating a rolling HDR film similar to what your eyes are creating for your brain.

Shooting this on film repeating say the camera panning and elapsed time and exposure increase and decrease as detailed above and combining these film images would then create a HDR fiilm / video. 


The following linsk explains this in more detail with some good images to give greater understanding:

Understanding and Using Ansel Adams' Zone System
http://photography.tutsplus.com/tutorials/understanding-using-ansel-adams-zone-system--photo-5607

The Digital Zone System
An article from the Outdoor Photographer
http://www.outdoorphotographer.com/how-to/shooting/the-digital-zone-system.html#.U1gvAFVdU1I


Friday 25 April 2014

DPP Part 3 - Processing the Image - Exercise 2 Managing Tone

DPP Part 3 - Processing the Image - Exercise 2 Managing Tone

The introduction to this section mentions viewing conditions of images are important. I know use a Colormunki Display for my Liyama monitor. In addition to regularly configuring my screen it also measures the LUX within the room and adjusts the monitor brightness accordingly.

I note from a OCA bulletin from Clive White that most students have their monitors / screen brightness too high. I do recall after my first configuration with the Colormunki that my screen appeared darker than how I had set it up.

I am using a RAW file for this exercise using Adobe CS6 which I am fortunate to be able to get at a student price as I am an OCA student. I will process this file per the exercise.

Opening the RAW file this is my starting position:


With shadow and highlight clipping on I see there is some over exposed elements on the white top my other half is wearing. I've adjusted the exposure slider to eliminate the highlight clipping from the image with the exception of the lamp mid right.

I've adjusted the shadows slider to bring out some of the lost detail around the beam and the Hulk's hair. I've adjusted black's slider to the point shadow clipping is just about to start.

Though this is a RAW file I note the RAW convertor opens this image as shot and the WB is already correctly set as amended the WB preset to Flash appears to make no difference to the image.

I've adjusted the saturation very slightly to bring out the Hulk's green colour which appeared in the image slightly washed out by the flash

I've adjusted the contrast to further bring the beams which appear lost in the shadows above the Hulk.

I've finally sharpened the image slightly.

This image is post RAW processing changes:


Exercise Learning's

a) Outside of the obvious required changes around exposure and white balance then all other changes are down to what the Photographer is trying to achieve and what he/she feels is the correct rendition of the image, will the image get enhanced or will be simply adjusted to reflect the photographer's visual recording of the scene with his / her eyes

b) The RAW file remains unchanged and the changes made by the RAW converter should be saved, I save these as a PSD file as this is a lossless format. I resize the image and save as a small jpeg for the purpose of my blog


DPP Part 3 - Processing the Image - Exercise 1: RAW

DPP Part 3 - Processing the Image - Exercise 1: RAW

The purpose of this exercise is to demonstrate processing advantages of Raw but at the same time to put these advantages in perspective.


Daylight Image - RAW
I've deliberately taken an image of an old building shooting toward the sun to make this a more interesting image to process. Opening the RAW file in CS6 I can adjust the tone curve and let the software make adjustments based on the lens I am using, I can see that I have over exposed the sky on the basis I'm shooting the side of the building that is in shade.However my adjusting the whites slider to the right I can remove all the highlight clipping, there is no shadow clipping in this image. I've increased vibrancy and saturation slightly. I've also increased the shadows slider to 35% to increase the detail that is not visible in the shadow areas of the image.

I've also sharpened the image the bring out the detail in the face of the building


Daylight Image - JPG
I've made some changes to colour and curves and sharpened the image but have been unable to recover any detail from the blown out sky that I could from the RAW file. The camera has WB set to auto:


Somewhere with the RAW file I've over processed the image, likely where I've adjusted whites to recover detail in the sky as the wall of the jpeg is more like the colour my eyes recorded. In this instance recovering detail in the sky has been at cost to the colour of the building, the jpeg retaining the original colour.

In this instance the jpeg appears the better image but this is simply because I haven't correctly processed the RAW. I've left this differences in images because it proves that even if processing in RAW retaining options, the photographers' post processing sjills are still a key element


Artificially Light

An indoor shot of a perfume bottle with a macro lens under tungsten light. The focus is entirely on the text on the bottle with a view to getting some interesting reflections of the bottle.  I could consider some product photography in the future as a way of testing my lighting and production skills

 - RAW

In the RAW processor I've used the Tungsten preset adjusted levels and exposure

 - JPEG

The auto white balance hasn't copied as well as I'd hoped. Of course with RAW I can can adjust more critically

HDR image

I've used a tripod and found a scene high in contrast that should suit a HDR type of image. I've bracketed the image 9 times exposing in increasing and decrease exposures of 1 stop so that I have the 2 extreme images at 4 stops over and 4 stops under what the camera metered as the perfect exposure.

Of course the files I've uploaded are both jpegs. I've made no changes to either RAW or JPEG simply to see what the combined HDR images between RAW and JPEG were. The RAW HDR appears to have more detail than the jpeg. However since I've created for both RAW and JPEG a 9 bracketed combined image then there is less reason to make any key changes to exposure as I've created in both cases images with a dynamic range of 8 stops.

 - RAW


 - JPEG

Most HDR images are made using jpegs. Photomatix is one of the more common utilities offering HDR and Tone Mapping options from a single or multiple source file


Exercise and Research Learning's
a) A RAW file captures much more detail than a JPEG and allows the photographer to control the processing of the image rather than the camera

b) A RAW processor such as photoshop offers many powerful processing options, including corrections to an known lens issues as standard for the focal length used

c) A jpeg is restricted to 256 levels of brightness, a RAW file can record between 4,000 and 16,000 e.g. jpeg in 8 bit and RAW in 12 and 14 bit

d) Exposure and White Balance are better corrected in the RAW processor than preset by the camera. Auto White balance does a good job but its not perfect. Preset WB I found struggles to do exactly what you want - how can it as its not a mind reader

e) RAW files allow non destructive editing. With a jpeg you are stuck with what the camera does to a degree in addition to the file being compressed with considerable data loss

f) RAW simply allows the better quality and allows the photographer to make the processing decisions - the key here is that they can be reset easily and started again

g) Jpeg allows faster processing as most of it may already be done and file uploads and back-ups are much quicker and take up less space

h) RAW files allow printing to much larger sizes. Perhaps for most anything bigger than A4 is not needed. However with RAW you always retain that option. What happens if you shoot a Wedding in jpeg only but if the couple want a a very large poster size print made, with RAW I can achieve this for any image I took, but with JPEG I may be stuck to a specific size that gives a maximum print size due to quality of image size I can print up to

i) View the files at a small size, sub 100k for use on the internet on a website or social media then size may not matter, but even still the processing options may

j) Crop zooming will show that the RAW files retain much more quality than jpeg due to the amount of data. For instance as a paparazzi the photographer may be kept at a distance from the subject but shooting in RAW may allow a higher quality zoom cropped image

k) Using RAW files relies on a level of post processing skill. Either time constraints or skill levels may be a key factor in deciding which to use

l) I shall continue to shoot in RAW and perhaps basic Jpeg