Tuesday, 23 July 2013

Thunder Storms

I had been ready to take images of the impending storms before I went to bed but they hadn't arrived. Instead in the Forest of Dean they arrived around 4am on Tuesday 23rd July

I couldn't really set a good composure because I was in the porch at the front of the house to protect my equipment from the rain. 

On a tripod with remote release in manual focus set to infinity long exposures were just not working, the brightness of the lightening was over exposing my images, it made night look like day. Through quick experimentation I found this combination at the time the most successful:

Aperture Priority: F/8
ISO: 8000 (yes 8000)
Shutter Speed: set by the camera at 1/20

I was using a D700. Issues as mentioned above were composition, exposure of lightening working in the dark, actually capturing a bolt of lightening rather than the light of one out of shot and having no experience of photographing lightening in the past.

The big lesson I learnt here was that if something is not working don't be afraid to experiment. This I did working as fast as I could.

This is best image I produced which I think made up for getting out of bed at 4am:


Sunday, 7 July 2013

TAOP - N & I - Exercise: A Narrative Picture Essay

A Narrative Picture Essay

This exercise requires "an assignment" to be set and then set about photographing it. The idea is to create a set of pictures that tell a story.

I've chosen my assignment to be a family day trip to the beach for lunch at Brean Sands on the south-west coast.

My blog doesn't allow to demonstrate the images in a the layout of a magazine so I will show each image individually then layout on an A4 word document and then try to screen print / save as a jpeg to show at the end.

I had planned out in my head roughly the type of images I wanted. I didn't want to formalise the story or have people specifically posing or feeling uncomfortable, I wanted to capture the story as it unfolded. Image wise the images could be seen a bit like holiday snaps but the purpose of the exercise was to create a story


Loading up the car boot


Walking to the Beach


Dinner Time on the beach


Stretching their Legs


Enjoying the Sea Breeze


Evidence of Action - Making Sand Castles


End of the Sun?


End of Summer?


Time to Go Home

Final Document

Organising the layout was quite because I had a view in mind that I wanted but I was in the end limited by what I could do in MS Word. There may perhaps be away of doing this better but having spent some time on the Internet this appeared the simplest and cleanest. I had kept 2 images back from those above to add some surprise humour at the end


TAOP - Assignment Four - Tutor feedback

I must thank my tutor for the very fast turnaround of my assignment I think it was 4 or 5 hours which must be an OCA record. I was pleased to get my feedback back quickly because Light was quite a large element of the TAOP module and took me some time to progress - plus its always with great anticipation that I await my feedback and then reflect on it.

I take it as a huge complement that my tutor comments on my abilities and am continuing to develop, I take special note that I perhaps could and should be looking to push myself further. I think that as my confidence and skills start to develop, that I more understand interpretation and creative freedom that the modules' exercises and the assignments allow I should consider undertaking elements a little more at the edge of my ability, take risk and extend my knowledge. I have never before undertaken any art development, I guess I didn't think I was a creative person. I do what to develop my own personality on my work - at the moment I'm not sure what that could be

I take special note of my tutors comments that I should expand my knowledge and understanding by attending exhibitions, I do actually have one to write up. I work away from home midweek so time is limited but that's no excuse and I do need to invest more of time if I am to fully embrace photography and to develop myself. I do read photography books, I think I should add some write-ups to my blog.

Here is my feedback, it will serve as an easy access reminder for and perhaps may also help anyone else reading:

Overall CommentsYet again a well-delivered assignment, the professional manner that the work is presented is a delight to assess .The variety of lighting and compositions shows a great understanding of lighting and its use to communicate shape, form, colour & texture.

Feedback on assignmentAnother well-presented PDF format shows that you care about your work and its presentation. With limited equipment you have produced a comprehensive collection of images that satisfy the brief and show that you have learned from previous exercises and especially with the delivery of this assignment. The quality of the images shows a very professional attitude and approach to the process. The object you choose has many attributes that you had successfully managed to capture, however, as a challenge, it does not for fill the ultimate challenge, if you had chosen something with more reflection and /or transparency it would have challenged you much harder and you may have found yourself pushing the limits of your very considerable skills. I suggest that if you do find a free couple of hours, try the same exercise with, a highly reflective object and also a transparent one such as a glass. This is a technical exercise that would challenge you but it will help push your skill base. Using continuous lighting or flash with model lights would be the way I would recommend.This is in no way compulsory, just a suggestion that you may wish to consider.In commercial practice some of the most highly skilled photographers are those who photograph cars and still life’s especially involving bottles & liquids.I suggest that you check out the association of photographers web site and look at a number of still life specialists, too numerous to name, but that is a good site to see contemporary professional practice of the highest quality. Though you have produced a very good set of images, and have used aperture choice to control focus, it would have been a stronger set of images if you had retained a uniform format. It helps hold a set of images together and gives a structure to the execution. 

Warren's Comments - I clearly need to improve my thinking from producing a set of images that fulfil a brief to producing a set of cohesive images. On reflection I think I had I imagined I was producing a set of 8 images for an exhibition then this may have adjusted my approach and enable a stronger submission. Currently I think I may get too absorbed by the challenge of the assignment and perhaps need to also take a step back almost helicopter view and then combine both elements. I will have an attempt using a transparent / reflective item and produce say one image each of the challenges in this assignment.

 
Learning Logs or Blogs/Critical essays The notation and BLOG is improving, however as the course progresses you will have to provide much more critical analysis. This simple assignment would be hard to extend, but more refection would be required. I do not see much about what exhibitions, work you have seen, lots of technical work is good, but without the content and understanding about historic and contemporary, photography and art, all you are producing has limited depth. 

Warren's Comments - This is a valid point and is a weakness. Its not that I omit this aspect on purpose, its that I'm not making it happen. In addition I should blog more about my reading and on-line research and perhaps detail how it impacts me and what I take away rather than just saying I've done it because it does certainly influence my understand and without a doubt its allowing me to develop. I think this may help address the valid point below


Suggested reading/viewing /action

 The Art of photography is the title of this module, but there is not enough evidence of your engagement with this aspect, read and research, all the recommended books, see where there are exhibitions and engage with the Art of photography 

Pointers for the next assignment
Research the next assignment and send me your suggestions, I feel that it is important to ensure a suitable subject/project is found that will challenge and produce the quality I know you are capable of.

Warren's Comments - I am pleased with my tutor's feedback and faith in my abilities. I feel a lot stronger and confident now than I did at the start of this module. The key for me is to push and strive to continue to improve - this will mean attempting things I may feel uncomfortable doing but that's the key - I mustn't stay with in a comfort zone. Of course pushing at boundaries will also increase risk of failure but then that is also a good way of learning


I've taken on my tutor's challenge!

3rd August 2013
In the assignment feedback above you will see that tutor mentioned that I did not take on the ultimate challenge which was using something reflective and transparent. I have 2 comments:

i) I'm always up for a challenge - I've started one by pursuing a degree in photography
ii) My tutor is right, reflection and transparency are the ultimate challenge.

I've created a set of images creating one image for each of the assignment 4 criteria. 

In my earlier 20's I had an opportunity to holiday in what was known at the time as Yugoslavia, a beautiful country with very warm and friendly people. They introduced to a drink called mish-mash. Its a surprisingly refreshing drink and I challenge back my tutor to make and drink one....its very simple. These would normally be served in a large jug but can be made in a glass.

Recipe:
a) one glass
b) cold orangeade / orange fanta
c) red wine
d) a teaspoon

Method
a) pour 3/4 glass with orangeade
b) hold teaspoon in glass close to surface of orangeade, with back of spoon facing upwards
c) gently pour red wine over back of teaspoon creating layer of wine on top
d) drink and let me know if you like it - Image 4 best shows the finished article


Image 1 - Shape


A low key image using underpowered flash behind left of glass to accentuate shape of glass and slightly under expose image. There are reflection artefacts in the image, I think should have used black card held by one or 2 assistants to help reduce flash bouncing of card, walls and ceiling. 


Image 2 - Form
Where as image 1 above has the glass in profile I've moved the camera over the subject and use the curving lines of the glass and liquid to emphasise the full 3D element of the glass. Again with flash handheld I've bounced the light off the ceiling to reducing the power of the flash but to bring the lighting down on top of the glass. Unfortunately I've still got reflection artefacts  the notable on right of glass on the liquid. 


Image 3 - Texture
I'm really not sure how I could have demonstrated the texture of glass without perhaps a microscope type image. Instead I've chosen to use the liquid in the glass to demonstrate it. I tried doing this myself blowing through a straw, holding the flash and using the shutter remote but it was impossible. I've asked an assistant to perform the blowing through a straw getting the straw end as close to the liquid but out of shot, the flash used front left across glass to freeze the liquid in its movement. I have struggled with focus here


Image 4 - Colour
A high key image taken before images 2 and 3. This required a lot of shots to try to best display the colours of the liquid. The flash was left and low and of the images I took I felt this had the best display of the colours of the liquid

Overall Comments post Tutor challenge
He was right, this was the ultimate challenge, I'm not sure how well I fulfilled the belief my tutor has in my skills but it most certainly pushed me outside of a comfort bubble, if indeed I was in one before.

I am pleased I've attempted this and from the challenges I've encountered I can see I have much room for improvement. My biggest problem is reflection and the over exposed artefacts this causes. These are great as catch-lights in eyes in portraits and can be used when intended on liquids and reflective subjects such as glass - however intention and visualisation is the key - technically creating the images is the art.

I think I have much room for improvement and it would be good for me to attempt this again when I develop more skills and knowledge e.g. intention of reflection, elimination of reflection, use of extras e.g. dark card to shoot through. A lot more experimentation and reading

TAOP - Assignment Four - Applying Lighting Techniques


TAOP - Assignment Four - Applying Lighting Techniques


The objective of this assignment is to demonstrate lighting techniques that I have experimented with and learnt as part of this section of the course to bring out different the physical properties of the same subject.
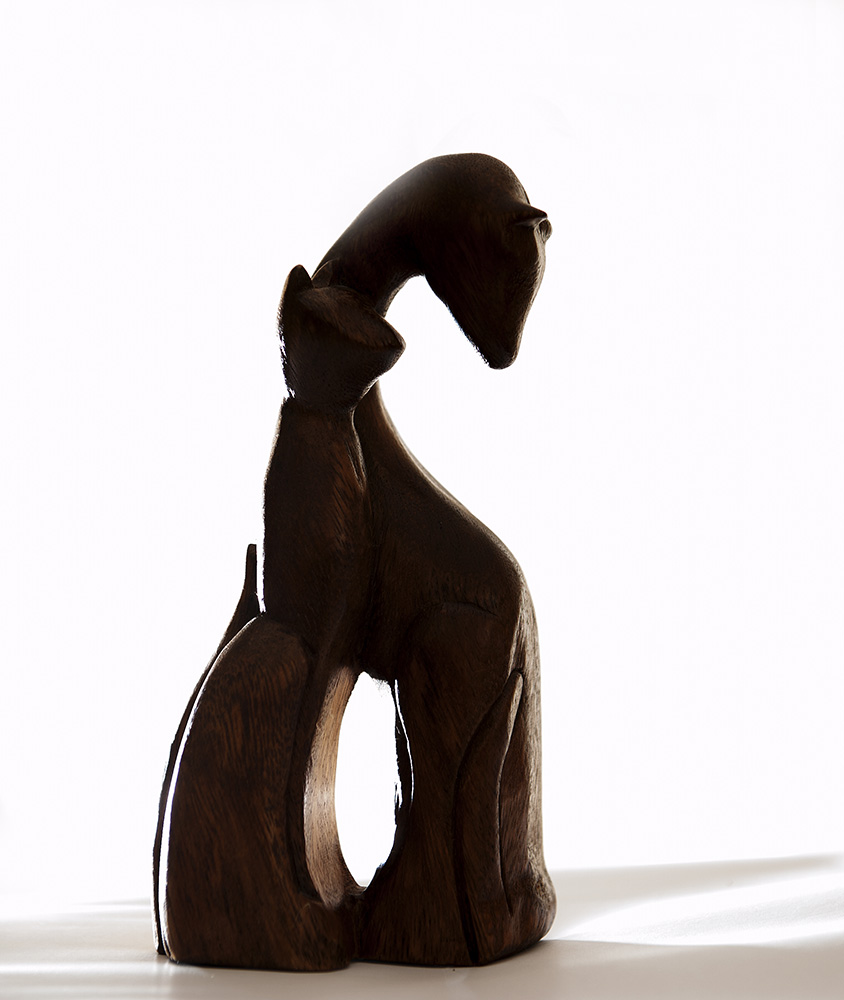
I have used wooden carving / statuette of 2 cats standing upright and have used different lighting to display the following qualities of the subject:


 - Shape
 -    Form
 - Texture
 -    Colour


In addition to the course notes and experiments I performed as part of the exercises in the Light section of the module I have also used the following references for further information and knowledge:

1. Book - The Hot Shoe Diaries by Joe McNally
2.  Book – Lighting for Portrait Photography by Steve Bavister
3. Internet – Emphasise Shape and Form in Macro Photography by Thomas Clark:

4. Internet – Photography lighting technique to show texture by Sasha Gitin:

5.     Internet – False Color Technique by Lee Varis:
http://blog.varis.com/2013/05/11/false-color-technique/


Shape – Image 1

For this image I've created a high key image to contrast the dark wood of the sculpture against the white background and white base.
In all my shape and form images I've wanted to keep a definitive and tangible base upon which the statue sits. This is important to me as I've wanted to create a stable image of the sculpture and avoid it looking as if it’s falling through the frame. I've achieved this by using a white sheet background and white card on a stool - e.g. two different materials that would catch the light differently. For this high image I've created a fairly large gap between the sculpture and the background so that using a wide aperture will put the background.
I've used a remotely controlled flash gun with a simple diffuser to spread and soften the light. To help create the high key look I've boosted the flash to +3ev and I've also over exposed the image by 2 stops. I experimented both adjust the flash power and the in camera over exposure and most importantly adjusted one item at a time. I did also slightly adjust the exposure in post production.
The flash was placed to the left of the camera and slightly below and behind the subject. I’ve wanted to avoid a 100% black silhouetted type subject so that it can still be recognised but at the same time focus the viewer on the flowing lines and shape of the image through the  contrast of light and dark


Shape – Image 2

I set out to create a lower key image in contrast to the first. I’ve created a 2 foot snoot from a cardboard roll and with the camera on a tripod and using a remote I’ve hand held a remote flash triggered from the camera.
The flash and snoot combination were hand held (flash in left hand and remote in the right hand) and is positioned high and above to the left of the subject and slightly behind. Folding the edge of the white card on the right has bounced back some of the light. This has lit the inside oval shape within the sculpture which contrasts well with the darker face toward which the camera and viewer are facing. This adds further shape to the image in both its profile and the oval hole however in using different light both in its focus and its colour (caused by the long brown cardboard tube).
Using light in this way I believe I have expressed the shape of the sculpture but using a lower key lighting effect created a much softer image.


Form – Image 1


To enable the form of a subject to be displayed within a photograph it needs to be 3 dimensional. In a 2 dimensional photograph this is always difficult. Direct light “contre jour” with the subject between or front lit will create a very flat subject and so an image of a subject without form.
I have turned the sculpture to a 45 degree angle to allow the light to both light parts of it as well as parts in shadow.
Using diffused lighting at the side of the image and low I have created soft lighting that has emphasised the form of the subject through contrast as the light reflects in different ways from the subject and also creates varying shadow. I have experimented moving the flash with diffuser both closer and away from the subject until I have been able to create a shadow on the white card that the subject sits on. This dark shadow also contrasts with the card and because the light is pointed at a different angle to the camera the resulting shadow is a different shape to what the camera and viewer is seeing. This further reveals to the viewer that the subject has 3 dimensional properties and its form is further emphasised.


Form – Image 2


Using the same subject position but a different lighting position the form of the wooden sculpture is revealed in a different way. I've used the diffuser on a remote flash from almost centrally above the sculpture of the cats and have varied the height of the flash to vary the softness of the shadow.
Slight adjustments of the light have enabled me to almost paint with the light so the distinctly carved bottom half of the cat in the foreground is a different colour to the top half. Using the light in this way the tail of the foreground cat on its left is now much more distinct and visible than in the image above. Its curved shape is now also more visible and emphasised by the tail
The left leg of the bigger cat behind the smaller cat is now also much more distinct.
The light is above the subject and creates a smaller shadow, much like the sun will at mid-day. This shape of the shadow further helps show the 3D form of the subject


Texture – Image 1


The full size image is required to appreciate the texture of the wood grain in this image. I have deliberately used a wide aperture and a single focus point so that the head of larger cat is the focus point. The rest of the cat’s body is slightly of focus due to the small depth of field.
In doing this I hope that the viewer’s eye is drawn up the image to the larger cat’s head. Use diffused light hand held across the top of the statue I've attempted to capture within the image the grain of the wood and its slight undulations made more obvious by very small shadows within the pits of the wood. From my research I have learnt how light aimed across a subject with undulations will help highlight the variations with shadows. I read this is best created with the light behind the subject so the shadows fall toward the camera. However I found by experiment moving the light around that in this case it appeared to be best created with light across the subject.


Texture – Image 2


I've used the widest aperture my lens allows and focused just below on the left ear of the largest cat. This has enabled me to put out of focus the elements that I don’t want the viewer to look at and instead focus directly on the elements in focus, the grain of the wood.
This time I've moved the light to the right of the subject and aimed this across the face of the cat. A different lower camera angle than the earlier image gives a slightly different perspective, the small depth of field gives a nice soft focus to the outside shape of the cat’s head and further draws the viewer into the centre of the head and the point of focus.


Colour – Image 1


I've used a handmade snoot from cardboard and attached this to my flash. Before doing this I've slid over the flash gun’s own diffuser. My intention was to create the direct light that can be achieved with a snoot but for this light to be soft and look like dappled light. This I envisaged would vary the colour of the wooden statue as some elements were lit and some were not.

I was very pleased with lighting effect I created and this is something I intend to experiment further with a later time with portrait images. I suspect there is also further experimentation to be had with adding elements like strips across the end of the snoot.

The softer light has enabled softer colour variations of the subject without distinct colour changes


Colour – Image 2


I've again used the home-made cardboard snoot and hand held the flash and moved the light around until I've been able to successfully isolate the cat’s head on the right with the light.
The snoot was aimed high to the left and slightly on front of the statue
This has lightened the colour of the wood in comparison to the rest of the statue and shows a contrast of colour. I am a little bit concerned at the reflection of the light that has caught the leading edge of the left hand cat’s face and of the left ear (as we look) of the cat to the right. I think I may have been able to correct this creating a layer under exposing these elements and bring these into the final image. However I decided my post processing skills were not quite up to this and preferred the image as was captured.
The stronger light in this image compared to the earlier image has created a stronger colour difference of the taller cat’s head compared to the rest of the statue.


Some image experiments I didn't use for my Assignment

I'm sure like most photographers not all pre-visualisations / camera techniques come off and I'm no exception. I had a lot more than these but they act as some examples of my critique process. Digital photography allows much more experimentation and instant review of images. If you are prepared to experiment and make mistakes then learning and understanding can sometimes be accelerated:


This image was going to be used for form but the subject being backlit  flatted the image, 2d rather than 3d


The lighting was good for firm but my composition of the image wasn't what I wanted


Attempting to create a high key image for shape and experimenting with flash exposure and in camera exposure, in this instance the subject is too washed out and over exposed, I wanted to put the subject into almost silhouette


The lighting in terms of strength was good but the light coverage of the subject was not right and the head was not lit for the tallest cat

Assignment  Learning

a) Careful and precise use of light can enable a single object to reveal multiple qualities of the subject

b) Minor changes such as height and proximity of the light to the subject can create different depth and shadow to a subject as well as give it a 3 dimensional or 2 dimensional perspective subject to the visualisation of the photographer

c) Light can be used to alter the colour of a subject through different strengths of light. Of course this can be used using flash gels but simple use of light coverage and strength can vary colour also

d) Light can be used to isolate elements of the subject, this can be powerful if for instance wanting to say isolate a subject's eyes

e) Whilst professional light shaping tools can be expensive home made ones can be cheap. I found by cardboard snoot very helpful and fun to experiment with

f) I found Light one of the most interest elements of the course so far and also one of the most challenging but at the same time fun. 

g) It may be important to practise and experiment with light on still life since this may not be possible or acceptable to the subject if doing human or pet portraiture

h) Use of a single light source is challenging, use of two light sources I think will be much more difficult

i) Soft light is much more flattering to a subject and this could be an important aspect when taking portrait images using light

j) There are large number of reference sites to use for light!


TAOP - Light - Exercise: Shiny Surfaces

The purpose of this exercise is to respond to the tricky challenge of photographing reflective surfaces.

I've bought some tracing paper so off we go:

Image 1

The light reflection was just one challenge, unfortunately the size of the tracing paper was another. I began to have reservations regarding how this exercise was going to work. I'll try something smaller to photograph.


Image 2
This is the starting position and the challenge of the light reflection can be seen on the back of the spoon.


Image 3
I've half built the paper cone and I can see this will be a problem, vignette caused by the cone.


Image 4
The cone is almost complete and I'm not really sure how this will work; I'd need a massive piece of tracing paper to build the cone wide enough to keep it out of the image.


Image 5
I think this is turning out to be a disaster. I don't think I really wont to spend large amounts of money to buy a big enough piece of tracing paper, I spent a bit on the white card for the previous exercise. I can see the challenge of photographing shiny objects but for me this solution isn't working.

However I realise the future option of trying this when presented with this challenge in the future.

TAOP - Light Exercise: Concentrating Light

This exercise was about creating a strong spotlight effect. I used the cardboard tube that the white card I bought for the previous exercise arrived in

Image 1

I've attached the snoot to the flash I've added on top of the camera, its easy to to see the problem I have and also what my snoot looks like :D


Image 3
For the second image I cut the cardboard makeshift snoot in half and specifically lit the note book. White paper has caused the light to be strongly reflected back. However with big bold text on the notebook a specific message could be passed back to the image viewer


Image 3
A small adjustment to the snoot and I can specifically light a different element of the image, change the image's subject and direct the viewer to an alternate subject I want them to first look at in the image. 


Exercise Learnings
a) a man made snoot created from discarded packaging material can be every bit as effective as one bought from a photography shop

b) length of snoot and length of focal length are considerations if the snoot is not wanted in the final image, see image one

c) using a snoot and focusing the light specifically can mean the rest of the image is not lit quite right, I feel this is the case with image 3. Options are to use a second light source or to use layers in Adobe Photoshop and correct the underexposed elements in the image and blend the layers

d) I think this will be another interesting element for me to experiment in for portraits, even to just try to creating the lighting in the image of Dorothy Norman in 1935 by Alfred Stieglitz. The image Michael Freeman has used in his course notes is the 7th in the top row of image found in this link. Its clear that this model appears to be a favourite of Stieglitz, as can be seen in this series of images:
https://www.google.co.uk/search?q=Dorothy+Norman+in+1935+by+Alfred+Stieglitz&tbm=isch&tbo=u&source=univ&sa=X&ei=nInZUdCAJqqa0QWCrIDQCg&ved=0CDEQsAQ&biw=1141&bih=639


TAOP - Light - Exercise: Contrast and Shadow Fill

This exercise is about creating contrasty images using a variety of reflectors


No light and no reflectors
This first image is the starting position using no light or reflectors


Images sorted in decreasing levels of contrast


Light from right and no reflector


I think this image has strong contrast with light from the right contrasting against no light and no reflected light on the left


Light from right and white card reflector 6 feet away

There appears to be slightly more light on the left hand side reflected by the white card than with no reflector at all


Light from right and white card reflector 3 feet away

There is slightly more light coming from left but to be honest I notice the background colour changing more as light is bounced back to the subject


Light from right and non-shiny silver card reflector 
This for me has created a good level of contrast with light not too extreme between light and dark


Light from right and crumpled shiny silver card reflector 
I think this effect is good for reflecting back light but no necessarily back towards its source, it appears to spread the light


Light from right and shiny silver card reflector 

This image appears to have the least contrast with more light being reflected


Exercise Learnings

a) use of light in images can be used to subtly change the subject

b) images with strong contrast of light can be used to create a moody image, it would be good for me to experiment here with mono images where the range in tones will be more apparent with no colour distraction

c) I think this exercise has shown me how to experiment and play with light to create varying portraits e.g. from a traditional type of portrait to one that can create a portrait with character where elements of the subject can be brought out

d) there are many options I've now experimented in using  white and silver reflectors. Using additional colour such as a gold reflector could install warmth into an image. I do recall where at stage shows the lighting directors use a very large range of colours and colour diffusers for the stage performers

e) using reflected light needs much practise to understand the levels of reflection and strength of light that can be obtained.

f) use of cheap and easy to obtain materials shows that if doing a specific type of photography shoot that there are many types of material that can easily be obtained to assist with light correction or manipulation